Linux
There are 21 posts tagged Linux (this is page 1 of 3).
How to run your Kotlin gradle built app from the command line
So you build your Kotlin app, you went through the trouble of creating a build.gradle script that you build with
gradle assemble
this outputs a a “build/libs/kotlin.jar” .jar file, but you have no clue how to run your Kotlin code from the command line.
Doing it by hand with “java -cp
gradle run
or even
gradle -b /home/myuser/mykotlinapp/build.gradle run
in case you need to run your Kotlin script from a cronjob.
Make sure you have the following inside your build.gradle script in order to make the “run” task available
apply plugin: 'application'
// DO notice the "Kt" suffix on the class name below, if you don't use the Kt generated class you will get errors
mainClassName = 'com.myapp.MyKotlinAppKt'
// optional: add one string per argument you want as the default JVM args
applicationDefaultJvmArgs = ["-Xms512m", "-Xmx1g"]
What if I don’t want to use gradle, and just java
ok… ok…
java -cp $KOTLIN_LIB/kotlin-runtime.jar:build/libs/kotlin.jar:
What to do when lighttpd won’t start and won’t give out any error output?
So you upgraded your server, or just all of a sudden you try to start lighttpd, it says the server started ok, but you check and there’s no lighttpd process.
You then go after your error log files, and nothing… what the fuck is happening?
try this to attempt to debug.
sudo strace -ff /usr/local/sbin/lighttpd -f /etc/lighttpd/lighttpd.conf
In my case the output showed me lighttpd was having permission issues trying to access a log file…
[pid 28073] close(5) = 0
[pid 28073] munmap(0x7fe884c71000, 4096) = 0
[pid 28073] write(3, "2015-02-04 11:04:23: (log.c.164)"..., 49) = 49
[pid 28073] close(2) = 0
[pid 28073] open("/dev/null", O_RDWR) = 2
[pid 28073] brk(0x2203000) = 0x2203000
[pid 28073] open("/home/bh/access.log", O_WRONLY|O_CREAT|O_APPEND, 0644) = -1 EACCES (Permission denied)
[pid 28073] write(3, "2015-02-04 11:04:23: (log.c.118)"..., 98) = 98
[pid 28073] write(3, "2015-02-04 11:04:23: (server.c.1"..., 83) = 83
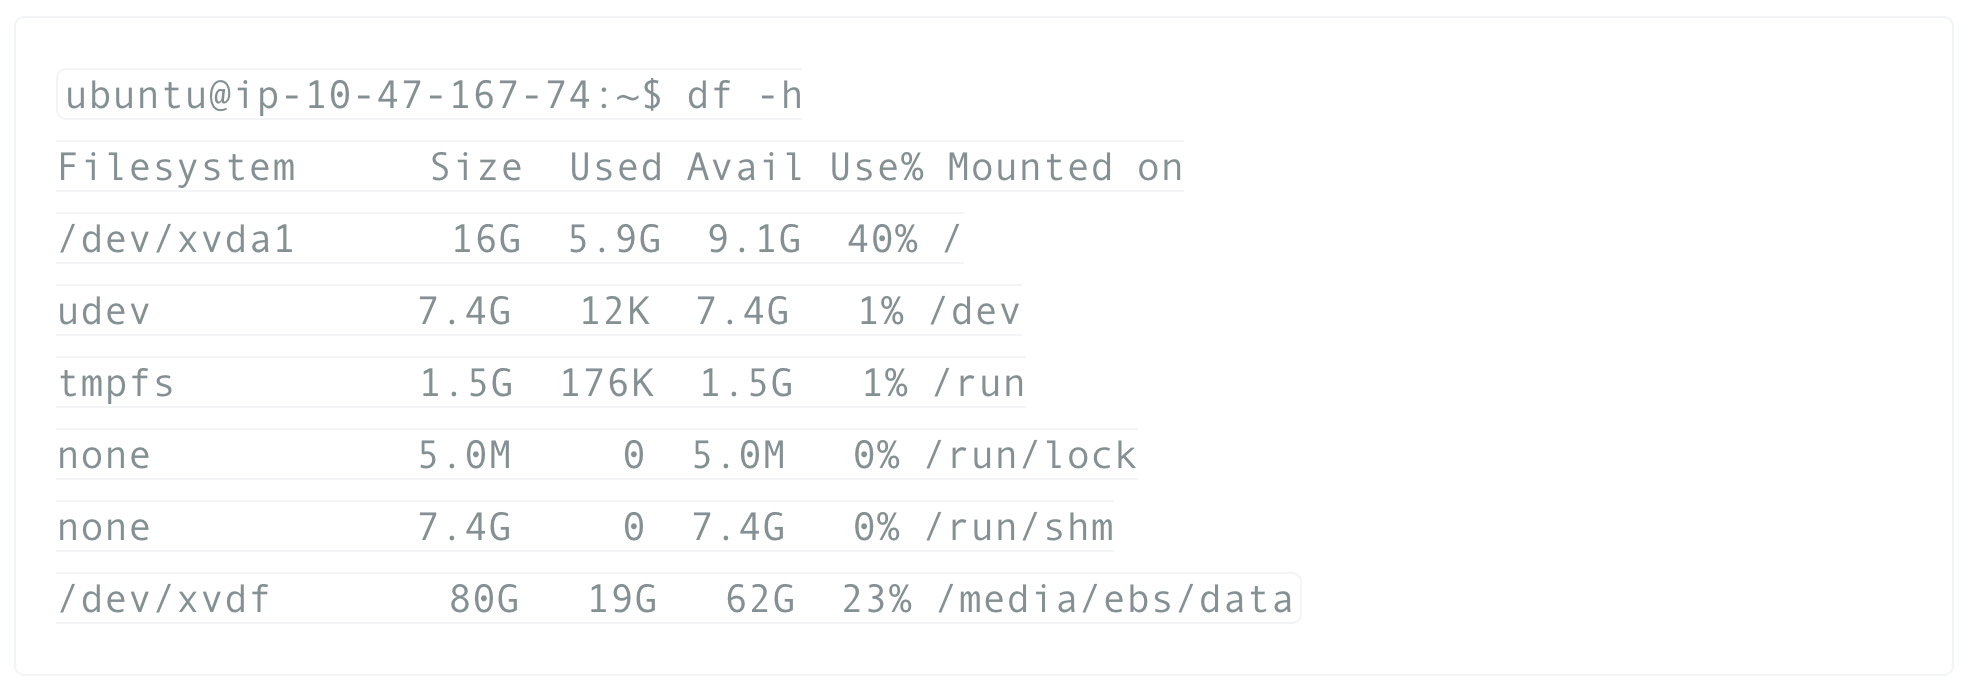
How to resize an EBS (xfs formatted) partition

First of all, create a snapshot of your EBS volume. Then out of that snapshot you will be able to create your new volume.
However, when you detach the old one from your instance and attach the new one, you will still see the old available space with df
look at my /dev/xvdf/
available space (after mounting the new EBS volume)
ubuntu@ip-10-47-167-74:~$ df -h
Filesystem Size Used Avail Use% Mounted on
/dev/xvda1 16G 5.9G 9.1G 40% /
udev 7.4G 12K 7.4G 1% /dev
tmpfs 1.5G 176K 1.5G 1% /run
none 5.0M 0 5.0M 0% /run/lock
none 7.4G 0 7.4G 0% /run/shm
/dev/xvdf 20G 19G 1.7G 92% /media/ebs/data <<< this one
still 20G, I mounted a 80G one!
This drive has been formatted to use an xfs
file system. In order to resize it, this is the command I used:
sudo xfs_growfs -d /media/ebs/data
output should be something like this
ubuntu@ip-10-47-167-74:~$ sudo xfs_growfs -d /media/ebs/data
meta-data=/dev/xvdf isize=256 agcount=4, agsize=1310720 blks
= sectsz=512 attr=2
data = bsize=4096 blocks=5242880, imaxpct=25
= sunit=0 swidth=0 blks
naming =version 2 bsize=4096 ascii-ci=0
log =internal bsize=4096 blocks=2560, version=2
= sectsz=512 sunit=0 blks, lazy-count=1
realtime =none extsz=4096 blocks=0, rtextents=0
data blocks changed from 5242880 to 20971520
now let’s see the df -h
output
ubuntu@ip-10-47-167-74:~$ df -h
Filesystem Size Used Avail Use% Mounted on
/dev/xvda1 16G 5.9G 9.1G 40% /
udev 7.4G 12K 7.4G 1% /dev
tmpfs 1.5G 176K 1.5G 1% /run
none 5.0M 0 5.0M 0% /run/lock
none 7.4G 0 7.4G 0% /run/shm
/dev/xvdf 80G 19G 62G 23% /media/ebs/data
AWS troubleshooting: how to fix a broken EBS volume (bad superblock on xfs)

As great as EBS volumes are on Amazon Web Services, they can break and not ever mount again, even though your data could still be there intact, a simple corruption on the filesystem structure can cause a lot of damage. On this post I teach you how to move all that data onto a new EBS drive, so keep calm and read slowly.
So, you try to mount your drive after some updates and you get an error like this on dmesg | tail:
[56439860.329754] XFS (xvdf): Corruption detected. Unmount and run xfs_repair
so you unmount your drive, invoke xfs_repair and you get this…
$ sudo xfs_repair -n /dev/xvdf
Phase 1 - find and verify superblock...
bad primary superblock - bad magic number !!!
attempting to find secondary superblock...
..........................................
and no good secondary superblock is found.
Don’t panic, this is what you have to do next to solve this issue:
- Go to your AWS dashboard, EC2 section.
- Click on “Volumes”
- Find the broken volume.
- Create a snapshot of the broken volume (this takes a while)
- Create a new volume the same size (or larger than) your old drive out of the snapshot you just created (this takes a while)
- Attach your new volume to the same EC2 instance (no need to reboot or anything), if the old drive was mapped to /dev/xvdf, the new one will be mapped to /dev/xvdg (see how the last letter increases alphabetically)
Now here’s a gotcha, Amazon will not create your new drive using the same file system type (xfs), for some reason it will create it using the ext2 filesystem.
$ sudo file -s /dev/xvdg
/dev/xvdg: Linux rev 1.0 ext2 filesystem data (mounted or unclean), UUID=2e35874f-1d21-4d2d-b42b-ae27966e0aab (large files)
Here you have two options:
1. Live with the new ext2 file system, make sure your /etc/fstab is updated to look something like this:
/dev/xvdg /path/to/mount/to auto defaults,nobootwait,noatime 0 0
or 2. copy the contents of your drive to a temporary location, usually inside /mnt which has plenty of space from that ephemeral drive the ec2 instances come to, and then mkfs.xfs the new volume, and then copy the contents back… (which what I did, as I chose to create a larger drive and the ext2 format that came on the new volume only recognized the size of the snapshot)
Hope this saved your ass, leave a note if I did.
Remember to never do any irreversible action until you have a disk snapshot, try your best to never lose data.
How to have a Play framework app autostart during boot on Elastic Beanstalk CentOS ec2 instances
So you’ve created an Elastic Beanstalk environment, you have a play framework distribution which you’ve created using play dist (either on your local environment, or right there on the server, whatever you prefer)
play dist outputs a my-app-1.0.zip file which has a self-contained version of your app with all the necessary libraries and a start script.
Afer you unzip it, you end up with a my-app-1.0/lib/ folder and a start script.
Make sure it’s executable by using chmod +x start on the start script.
So now, this is all in the first ec2 instance of your elastic beanstalk environment, if you’re like me and you’ve used ubuntu/debian for your server management things can be slightly different here, since Amazon preferred CentOS for their default image, and here I’ll show you how to make your play app auto start when the server boots because you want every new machine that may be instanciated to have your app installed and to start the service as soon as the machine is up.
Create a /etc/init.d/myappd script
(I’m using ‘myapp’ here as an example, your app can be named whatever is named, so replace accordingly)
Wire it to autostart
The simplest way I found to have this script start when the server would boot was to add it at the end of the
/etc/rc.local file. (In ubuntu you’d register the new script with the upate-rc.d command)
can’t ssh to ec2 ubuntu instance, /etc/fstab breaks bootup due to missing ebs volume [SOLVED]
So the /etc/fstab file on your root volume looked like this
LABEL=cloudimg-rootfs / ext4 defaults 0 0
/dev/xvdf /mnt/backups auto defaults,comment=cloudconfig 0 2
by mistake you deleted the ebs volume that you had mounted on /mnt/backups (or whatever folder) and you restarted your ubuntu instance not knowing that if the /etc/fstab would break it would not continue to start all the application layer networking services like ssh on port 22…
you can ping the machine, but you can’t ssh, amazon support won’t respond or will tell you to fuck yourself.
you learn that ubuntu has had this bug for a while, but it’s been addressed by passing your volume configuration a nobootwait option.
you wish your /etc/fstab looked like this, but you can’t get in, amazon doesn’t give you any other options from their console to go in and solve the problem through a console…
LABEL=cloudimg-rootfs / ext4 defaults 0 0
/dev/xvdf /mnt/backups auto defaults,nobootwait,comment=cloudconfig 0 2
No worries, I have a fix that will let you edit that file, and boot back and try to recover things, you may have lost that ebs volume, but you won’t have to setup this computer again.
1. Make a snapshot of the root volume on that instance. This will take a while.
2. Make a new ebs volume of that snapshot and put it on the zone where the ec2 instance lives.
3. Create an identical temporary new ec2 instance on the same zone.
4. Attach the snapshot volume you created on step 2 to the new instance.
5. ssh to the new machine.
6. sudo fdisk -l, you should see all the attached devices, you will see something like this referring to the attached ebs
Disk /dev/xvdf: 8589 MB, 8589934592 bytes
255 heads, 63 sectors/track, 1044 cylinders, total 16777216 sectors
Units = sectors of 1 * 512 = 512 bytes
Sector size (logical/physical): 512 bytes / 512 bytes
I/O size (minimum/optimal): 512 bytes / 512 bytes
Disk identifier: 0x00000000
Disk /dev/xvdf doesn't contain a valid partition table
Don’t listen to that last message, you do have a valid partition.
7. Create a folder where to mount the disk. sudo mkdir /mnt/old-volume
8. Mount it sudo mount -t auto /dev/xvdf /mnt/old-volume
9. Get into /mnt/old-volume/etc/fstab and fix it.
10. Unmount /mnt/old-volume, turn off the instance, detach the repaired volume.
11. Turn off the original instance, detach the broken root volume (at /dev/sda1)
12. Attach the repaired volume to the original instance under /dev/sda1
13. Start the original instance.
14. ssh to it. (it will have a new ip address, make sure to update your DNS or load balancing entries)
15. Terminate the temporary instance and all the volumes that you won’t need.
16. Get to work.
17. Leave a tip below. 😉
My First Raspberry PI Project: DIY ARM Video Game Console.
I got everything on amazon, didn’t pay for shipping (Prime member):
So far I bought:
– Raspberry PI ($48)
– Raspberry PI case ($14)
– Power adapter ($2.25)
– SNES-like Controller with USB jack ($10.75)
– SanDisk SDHC 16GB class 6 (30mb/s) ($15)
I first intend to install Ubuntu ARM along with several video game console emulators for NES, SNES, SEGA, N64.
People at the Raspberry PI G+ Community have suggested instead to install arch linux and keep it light, I’ll go first for ubuntu since I know it well.
However I’m thinking that a more interesting option, given that it has an ARM processor is to install Android Jelly Bean on it and see if not only I can run game emulators on it, I’ll be running and testing FrostWire for Android on it.
Ever since I started developing FrostWire for Android I’ve thought that Android has everything in it to be a desktop operating system, maybe Raspberry PI’s will be the hardware I’ll use to prove my vision.
The idea is to end up with a nice tutorial on how to do this after I’m done so you can all do it. In the meantime I’ll keep posting updates.
ubuntu packages for a kick ass web server
Copy and paste the following list on a file, say “packages.txt”. To install all just do:
sudo apt-get install $(cat packages.txt)
accountsservice acpid adduser ant ant-optional apache2-utils apparmor apport apport-symptoms apt apt-transport-https apt-utils apt-xapian-index aptitude at base-files base-passwd bash bash-completion bc bind9-host bsdmainutils bsdutils busybox-initramfs busybox-static byobu bzip2 ca-certificates ca-certificates-java cloud-init cloud-initramfs-growroot cloud-initramfs-rescuevol cloud-utils command-not-found command-not-found-data console-setup consolekit coreutils cpio cpp cpp-4.6 crda cron cryptsetup-bin curl dash dbus dbus-x11 dconf-gsettings-backend dconf-service debconf debconf-i18n debianutils diffutils dmidecode dmsetup dnsutils dosfstools dpkg dstat e2fslibs e2fsprogs ed eject emacs emacs23 emacs23-bin-common emacs23-common emacsen-common euca2ools file findutils fontconfig fontconfig-config fonts-ubuntu-font-family-console friendly-recovery ftp fuse gamin gcc-4.6-base gconf-service gconf-service-backend gconf2 gconf2-common geoip-database gettext-base gir1.2-glib-2.0 gir1.2-gudev-1.0 gnupg gpgv grep groff-base grub-common grub-gfxpayload-lists grub-legacy-ec2 grub-pc grub-pc-bin grub2-common gvfs gvfs-common gvfs-daemons gvfs-libs gzip hdparm hicolor-icon-theme hostname htop icedtea-6-jre-cacao icedtea-6-jre-jamvm icedtea-7-jre-cacao icedtea-7-jre-jamvm icedtea-netx icedtea-netx-common ifupdown info initramfs-tools initramfs-tools-bin initscripts insserv install-info iproute iptables iputils-ping iputils-tracepath irqbalance isc-dhcp-client isc-dhcp-common iso-codes iw java-common kbd keyboard-configuration klibc-utils krb5-locales landscape-client landscape-common language-selector-common laptop-detect less libaccountsservice0 libacl1 libapr1 libaprutil1 libapt-inst1.4 libapt-pkg4.12 libasn1-8-heimdal libasound2 libasyncns0 libatasmart4 libatk-wrapper-java libatk-wrapper-java-jni libatk1.0-0 libatk1.0-data libattr1 libavahi-client3 libavahi-common-data libavahi-common3 libavahi-glib1 libbind9-80 libblkid1 libbonobo2-0 libbonobo2-common libboost-iostreams1.46.1 libbsd0 libbz2-1.0 libc-bin libc6 libcairo-gobject2 libcairo2 libcanberra0 libcap-ng0 libck-connector0 libclass-accessor-perl libclass-isa-perl libcomerr2 libcroco3 libcryptsetup4 libcups2 libcurl3 libcurl3-gnutls libcwidget3 libdatrie1 libdb5.1 libdbus-1-3 libdbus-glib-1-2 libdconf0 libdevmapper-event1.02.1 libdevmapper1.02.1 libdns81 libdrm-intel1 libdrm-nouveau1a libdrm-radeon1 libdrm2 libedit2 libelf1 libept1.4.12 libevent-2.0-5 libexpat1 libffi6 libflac8 libfontconfig1 libfontenc1 libfreetype6 libfribidi0 libfuse2 libgamin0 libgc1c2 libgcc1 libgconf-2-4 libgconf2-4 libgcrypt11 libgd2-noxpm libgdbm3 libgdk-pixbuf2.0-0 libgdk-pixbuf2.0-common libgdu0 libgeoip1 libgif4 libgirepository-1.0-1 libgl1-mesa-dri libgl1-mesa-glx libglapi-mesa libglib2.0-0 libgmp10 libgnome-keyring-common libgnome-keyring0 libgnome2-0 libgnome2-common libgnomevfs2-0 libgnomevfs2-common libgnutls26 libgpg-error0 libgpm2 libgssapi-krb5-2 libgssapi3-heimdal libgtk-3-0 libgtk-3-bin libgtk-3-common libgtk2.0-0 libgtk2.0-bin libgtk2.0-common libgudev-1.0-0 libhcrypto4-heimdal libheimbase1-heimdal libheimntlm0-heimdal libhx509-5-heimdal libice-dev libice6 libidl-common libidl0 libidn11 libio-string-perl libisc83 libisccc80 libisccfg82 libiw30 libjasper1 libjpeg-turbo8 libjpeg8 libjs-jquery libjson0 libk5crypto3 libkeyutils1 libklibc libkrb5-26-heimdal libkrb5-3 libkrb5support0 liblcms2-2 libldap-2.4-2 libllvm3.0 liblocale-gettext-perl liblockfile-bin liblockfile1 libltdl7 liblvm2app2.2 liblwres80 liblzma5 libm17n-0 libmagic1 libmount1 libmpc2 libmpfr4 libmysqlclient18 libncurses5 libncursesw5 libnewt0.52 libnfnetlink0 libnih-dbus1 libnih1 libnl-3-200 libnl-genl-3-200 libnspr4 libnss3 libnss3-1d libogg0 liborbit2 libotf0 libp11-kit0 libpam-ck-connector libpam-modules libpam-modules-bin libpam-runtime libpam0g libpango1.0-0 libparse-debianchangelog-perl libparted0debian1 libpcap0.8 libpci3 libpciaccess0 libpcre3 libpcsclite1 libpipeline1 libpixman-1-0 libplymouth2 libpng12-0 libpolkit-agent-1-0 libpolkit-backend-1-0 libpolkit-gobject-1-0 libpopt0 libpthread-stubs0 libpthread-stubs0-dev libpulse0 libpython2.7 libreadline5 libreadline6 libroken18-heimdal librsvg2-2 librtmp0 libsasl2-2 libsasl2-modules libselinux1 libsgutils2-2 libsigc++-2.0-0c2a libslang2 libsm-dev libsm6 libsndfile1 libsqlite3-0 libss2 libssl1.0.0 libstdc++6 libsub-name-perl libswitch-perl libtasn1-3 libtdb1 libterm-readkey-perl libterm-readline-perl-perl libtext-charwidth-perl libtext-iconv-perl libtext-wrapi18n-perl libthai-data libthai0 libtiff4 libtimedate-perl libtinfo5 libtorrent14 libudev0 libusb-0.1-4 libusb-1.0-0 libuuid1 libvorbis0a libvorbisenc2 libvorbisfile3 libwind0-heimdal libwrap0 libx11-6 libx11-data libx11-dev libx11-doc libx11-xcb1 libxapian22 libxau-dev libxau6 libxaw7 libxcb-glx0 libxcb-render0 libxcb-shape0 libxcb-shm0 libxcb1 libxcb1-dev libxcomposite1 libxcursor1 libxdamage1 libxdmcp-dev libxdmcp6 libxerces2-java libxext6 libxfixes3 libxft2 libxi6 libxinerama1 libxml-commons-external-java libxml-commons-resolver1.1-java libxml2 libxmlrpc-core-c3 libxmu6 libxmuu1 libxpm4 libxrandr2 libxrender1 libxt-dev libxt6 libxtst6 libxv1 libxxf86dga1 libxxf86vm1 libyaml-0-2 lighttpd linux-firmware linux-image-3.2.0-25-virtual linux-image-3.2.0-26-virtual linux-image-3.2.0-27-virtual linux-image-virtual linux-virtual locales lockfile-progs login logrotate lsb-base lsb-release lshw lsof ltrace m17n-contrib m17n-db makedev man-db manpages mawk memcached memtest86+ mercurial mercurial-common mime-support mlocate module-init-tools mount mountall mtools mtr-tiny multiarch-support mysql-common nano ncurses-base ncurses-bin net-tools netbase netcat-openbsd nethogs ntfs-3g ntpdate openjdk-6-jre openjdk-6-jre-headless openjdk-6-jre-lib openjdk-7-jdk openjdk-7-jre openjdk-7-jre-headless openjdk-7-jre-lib openssh-client openssh-server openssl os-prober parted passwd patch pciutils perl perl-base perl-modules php5 php5-cgi php5-cli php5-common php5-mysql plymouth plymouth-theme-ubuntu-text policykit-1 policykit-1-gnome popularity-contest powermgmt-base ppp pppconfig pppoeconf procps psmisc python python-apport python-apt python-apt-common python-boto python-chardet python-cheetah python-configobj python-crypto python-dbus python-dbus-dev python-debian python-gdbm python-gi python-gnupginterface python-httplib2 python-keyring python-launchpadlib python-lazr.restfulclient python-lazr.uri python-m2crypto python-minimal python-newt python-oauth python-openssl python-pam python-paramiko python-pkg-resources python-problem-report python-pycurl python-serial python-simplejson python-software-properties python-twisted-bin python-twisted-core python-twisted-names python-twisted-web python-wadllib python-xapian python-yaml python-zope.interface python2.7 python2.7-minimal readline-common resolvconf rsync rsyslog rtorrent screen sed sensible-utils sgml-base shared-mime-info sound-theme-freedesktop spawn-fcgi ssh-import-id strace sudo sysv-rc sysvinit-utils tar tasksel tasksel-data tcpd tcpdump telnet time tmux ttf-dejavu-core ttf-dejavu-extra tzdata tzdata-java ubuntu-keyring ubuntu-minimal ubuntu-standard ucf udev udisks ufw unattended-upgrades update-manager-core update-notifier-common upstart ureadahead usbutils util-linux uuid-runtime vim vim-common vim-runtime vim-tiny w3m wget whiptail whoopsie wireless-regdb wireless-tools wpasupplicant x11-common x11-utils x11proto-core-dev x11proto-input-dev x11proto-kb-dev xauth xfsprogs xkb-data xml-core xorg-sgml-doctools xtrans-dev xz-lzma xz-utils zlib1g
These was the list of packages I ended up installing on a new web server machine until I stopped needing to put more things in it. I’ll come back and update this list in a few months.
I’ve put this list together because my AWS EC2 image instantiation didn’t work, so I did the old school solution, just install the same packages on a new machine and configure the computer, oh well.
lighttpd, allow “Access-Control-Allow-Origin:*” headers on the server status page
Maybe there’s someone out there who needs to read the output of lighttpd’s status for monitoring purpose like me tonight, and also, like me, you want to do this using JavaScript, but your browser gives you this nasty error:
XMLHttpRequest cannot load http://otherSubdomain.server.com/lighttpd-status-url-you-have-configured. Origin http://requestingSubdomain.server.com is not allowed by Access-Control-Allow-Origin.
lighttpd allows you to add a custom header for all requests by adding this in a given context:
[perl]setenv.add-response-header = ( "Access-Control-Allow-Origin" => "*" )[/perl]
For this to work, you must enable the mod_setenv.
But if you don’t enable this module, before you enable your mod_status module, you will never see the custom headers come out of your lighttpd HTTP response header output.
So make sure you enable mod_setenv like this:
[perl]
server.modules = (
"mod_fastcgi",
"mod_auth",
"mod_access",
"mod_alias",
"mod_accesslog",
# "mod_simple_vhost",
"mod_rewrite",
"mod_redirect",
"mod_setenv", #before mod_status, very important!
"mod_status",
# "mod_evhost",
"mod_compress",
…
[/perl]
The header output of your lighttpd status page should look like this now:
[bash]
Access-Control-Allow-Origin:*
Content-Length:5952
Content-Type:text/html
Date:Wed, 30 Nov 2011 01:27:04 GMT
Server:lighttpd/1.4.28
[/bash]
Hope this helps you.